Scenes
A Scene on our dashboard is a container that holds all the user sessions, all the Dynamic Objects that appear in the scene and an approximation of the scene geometry exported from Unity. Together, this allows you to replay sessions in SceneExplorer with context about where in your Unity scene the player is engaging with your gameplay.
Concepts
Uploading a Scene to the Cognitive3D dashboard from Unreal does two things:
- Creates this container to hold each Participant's Session Data (Gaze, Fixations, Dynamics, Events, Sensors). The Scene Id is returned to Unreal to identify where this Session Data should be sent.
- Exports and uploaded scene geometry to the Dashboard so you can see Session Data in the context of the scene.
None of your game logic is uploaded to our dashboard. Colliders, trigger volumes, npc paths, audio sources, etc are not represented by this scene geometry.
If your Level geometry changes during development, or doesn't represent the space the Participant is engaged in, you should create a new Scene Version. This will have the same results as uploading a new scene - a new container is created and new geometry is uploaded.
If you have Dynamic Objects in your Scene that change during development, you do not need to create a new Scene Version. See the Dynamic Objects page to see how to upload Dynamic Object Meshes to your scenes.
When should I upload a new version of my level?
These are the cases when a new version of your level is warranted:
- You make a substantial change to the base geometry of your level.
- You want to make a new, clean separation of data for you level.
- For example if you were doing test sessions and now want to launch a clean slate for production or deployment.
- You have substantially changed the Dynamic Objects in your level.
- For example if you changed object names, or removed them altogether, you will see those old objects in the Object List, despite removing them from your Unreal level, since the data has already been sent.
If you simply moved a Dynamic Object in the level, you do NOT need to re-upload anything.
SceneId
When loading a level in Unreal, the Session Data will be uploaded using the Scene Id of the last loaded level. This also applies if you are using level streaming to load additional levels at the same time - only the last loaded level with a valid SceneId will have session data recorded to it.
Manually setting SceneId
In most cases, letting the SceneId be updated as levels are loaded will be sufficient. In some situations, you might want to manually control what Scene the session data is recorded to. In Edit->Project Settings->Cognitive 3D, the Automatically Set Tracking Scene toggle can be unchecked. When you want to change the scene, you can use the following method:
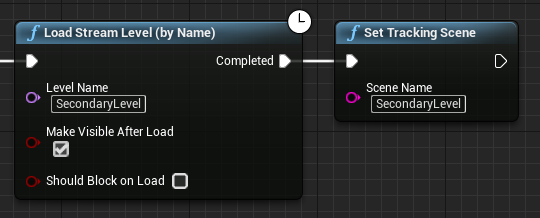
TWeakPtr<FAnalyticsProviderCognitive3D> provider = FAnalyticsCognitive3D::Get().GetCognitive3DProvider();
if (provider.IsValid())
{
    provider.Pin()->SetTrackingScene("your_scene_name");
}
Exporting Streaming Levels
There are several ways to export geometry when using multiple levels. In the examples below we will assume there is a level called Main and a level called EnvironmentArt.
Note
![]() Exporting levels and managing files can get confusing. Feel free to reach out for assistance. If you have a question or any feedback about our documentation please use the Intercom button in the lower right corner of any web page.
Exporting levels and managing files can get confusing. Feel free to reach out for assistance. If you have a question or any feedback about our documentation please use the Intercom button in the lower right corner of any web page.
Export only one level
Export just the EnvironmentArt level. This is the simplest solution if the contents of the level with art provide enough context about the space to make useful insights.
Exporting a temporary level
This concept is to combine all the art into a Unreal level and export that. You can upload your Main level using the combined content instead.
- Create a level called
Temporaryin Unreal - Copy and paste the contents of all 'Main' and 'EnvironmentArt' into the
Temporarylevel - Export the
Temporarylevel using the Scene Setup Window, but do not upload - In your project's directory, rename the
Cognitive3D_SceneExplorerExport/Temporaryfolder toMain - Open your
Mainlevel and open theSceneExportwindow - Do not export this level - the contents of the directory will be used instead when you upload.
Combine Exported levels Externally
This concept is to export each level from Unreal and combine them in an external program, such as Windows 3D builder, Blender, or another tool of your choice.
- Use the Scene Setup Window to export each level
- Open the 3D program of your choice
- Import the exported GLTF file of each level
- Save / Export the file as a GLTF in the
Cognitive3D_SceneExplorerExport/YourSceneNamedirectory of your project
Note
This can also be a simple way of previewing the contents of your exported file before uploading to the Dashboard. There might be slight differences based on the software.