Troubleshooting
Installing the SDK
The method of installing the Cognitive3D SDK using the git URL through Unity's Package Manager requires git to be installed on your computer. If you don't have git installed, we recommend downloading the package from GitHub and using the Add package from disk option in the Package Manager.
General Debugging
From the Cognitive3D menu, you can select Preferences. The Enable Logging checkbox will log more information from Cognitive3D components. This should be disabled in a release build.
Selecting your SDK
In the Scene Setup window you can select an SDK for a VR plugin you are using. This will set a scripting define symbol to enable code. If you do not have the SDK in your project or it is not the correct version, you may have compile errors. To manually clear the SDK settings, you can use Edit -> Project Settings -> Player. In Other Settings, clear any symbols that begin with C3D_.

SceneExplorer
The Scene Setup process generates temporary files in the Project/Cognitive3D_SceneExplorerExport folder. This can be deleted and regenerated as needed. This does not need to be included in your source control - add this folder to your .gitignore or .p4ignore file.
Some meshes are not exported
We do not currently support exporting Line Renderers, Trail Renderers, Particles, or procedural meshes that do not reference saved asset files. Some materials (such as transparent materials) may have issues rendering correctly on SceneExplorer.
Meshes that are a child of a Dynamic Object will be exported with that Dynamic Object and NOT exported with the scene.
Some lights are not exported
Area lights are not supported and will be skipped when exporting your scene. Many advanced properties from HDRP and URP lights are also not be supported.
I am getting an error when trying to upload my Scene or Dynamic Objects
We do not store the Developer Key in Unity project folders for security purposes and this key may be lost when moving PCs or changing engine versions.
You can get the Developer Key from the Dashboard and open the Scene Setup Window from the Cognitive3D menu. On the second page, you can enter and save your Developer Key. Then you can close this window.
Custom Shaders
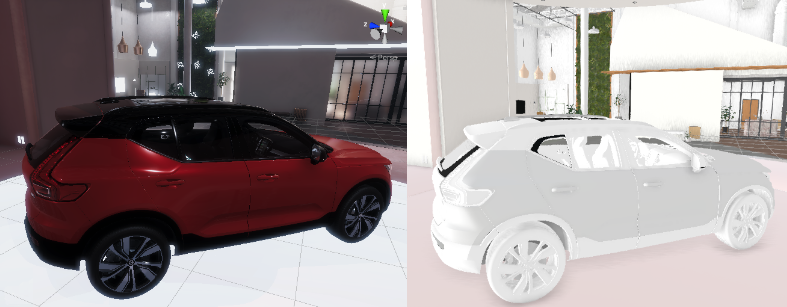
If you find a surface in SceneExplorer is white it is likely the surface in Unity is using a material with an unsupported shader.

When using shader graphs or different render pipelines materials may use different property names to identify textures and values. We automatically support many shaders that are included with Unity but you may need to add support for your custom shaders.
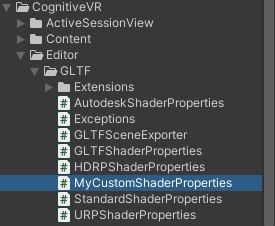
First, create a new script in the Cognitive3D/Editor/GLTF folder and name it something to represent the custom shader you wish to support.

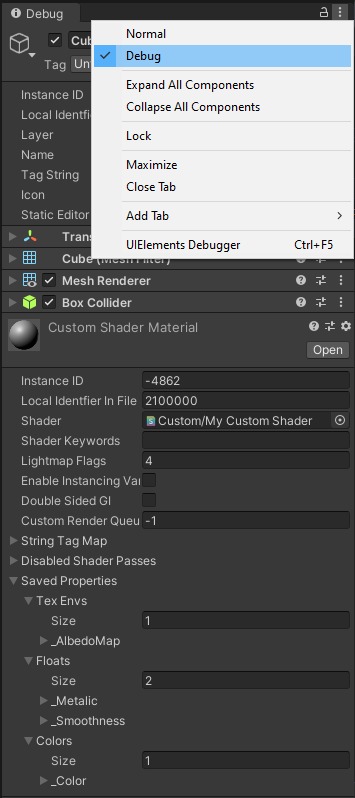
In Unity select one of the surfaces that appears white on SceneExplorer. In the top right of the Inspector select the Debug option from the dropdown menu. Notice the material properties at the bottom of the inspector. These values will be used in the script to identify which textures should be exported.

Open the script you created earlier. In the constructor set the names of material properties. In some cases you may need to override methods and perform additional logic on these values. Below is an example for a simple custom shader. The GLTF exporter will automatically select the correct ShaderPropertyCollection based on the ShaderNames.
using UnityEngine;

public class MyCustomShaderProperties : UnityGLTF.GLTFSceneExporter.ShaderPropertyCollection
{
    public MyCustomShaderProperties()
    {
        ShaderNames.Add("Custom/My Custom Shader"); //this should match the 'shader name' and not the filename of the shader
        AlbedoMapName = "_AlbedoMap"; //often uses the words: albedo, diffuse, base
        AlbedoColorName = "_Color";
        MetallicPowerName = "_Metalic"; //note the typo. if this is how it is written in the shader, and should match exactly
        RoughnessPowerName = "_Smoothness"; //often roughness, shininess, gloss, smoothness
    }

    //gltf uses roughness. in this case, we can override this method and do some logic
    //roughness = 1 - shininess
    public override bool TryGetRoughness(Material m, out float power)
    {
        power = 1 - m.GetFloat("_Smoothness");
        return true;
    }
}
Player Position and Gaze Tracking
Main Camera
The player's HMD expects to use use a camera tagged MainCamera. If there are multiple MainCameras in the scene there may be unexpected results in your session data.
No data uploaded to SceneExplorer
There are a few common reasons data from your play session might not display on SceneExplorer:
No Cognitive3D_Manager
Make sure there is a Cognitive3D_Manager in your scene.
The scene does not have a SceneId associated with it
The SceneId is the ID used by SceneExplorer to send data to the correct scene. Without a SceneId data is not collected and not uploaded. This is automatically set when you export your scene. You can also see your Scene Settings from the Cognitive3D -> Preferences menu.
Application is closed unexpectedly
Unity's implementation of OnQuit does not work as expected when the process ends without calling Application.Quit. This also doesn't always work as expected on mobile. When possible, call Cognitive3D.Cognitive3D_Manager.FlushData(); to reliably send data to SceneExplorer.
Heatmap isn't visible on SceneExplorer
Make sure your world and Dynamic Objects have colliders and that the colliders are not set as 'trigger'. You should also try to get your collider's size to be as close as possible to the surface of your mesh.
What are these purple spheres?
These represent Fixations in the session. They are more accurate and indicate where the participant's eyes focused during their experience but they might not provide the high level overview a heatmap can. You can switch between Gaze heatmaps and Fixation spheres in the Gaze dropdown menu.
The Gaze line is quickly moving around in impossible ways
Data is validated in the SDK before it is available in SceneExplorer. It's possible that the line is being drawn onto a Dynamic Object that doesn't have a mesh to represent it. In Unity, open the Manage Dynamic Objects window from the Cognitive3D menu. Make sure your meshes are exported and uploaded.
Enable Location Data
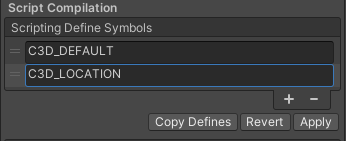
Access to Location data (GPS or IP geolocation) is not accepted in all app stores and is disabled by default. To enable recording location data open Project Settings. In the Player Settings section, add C3D_LOCATION to the scripting define symbols and press 'Apply'.

SteamVR Controller Inputs
Controller Input Tracking is supported for the Vive Controller using SteamVR 2.7.3
Before running the Cognitive Scene Setup Window, you must have opened the SteamVR Input Window and pressed Save and generate. After pressing Setup Controller Dynamics, Append Cognitive Action Set and Add Default Bindings.
Finally, you must open the SteamVR Input Window again and press Save and Generate.
ExitPoll
ExitPoll panel never appears
Collision
Collision is off by default but make sure the LayerMask is correctly configured when the ExitPoll is spawned. If you are using the Oculus Utilities OVRPlayerCharacter prefab, it could be colliding with the CharacterController collider. It may also be colliding with the player's hands or held items.
No Question Set
If the Hook is set but doesn't have a Question Set assigned, the Exitpoll prefabs will silently continue as if they were completed. This can be checked on the Dashboard.

![]() If you have a question or any feedback about our documentation please use the Intercom button in the lower right corner of any web page.
If you have a question or any feedback about our documentation please use the Intercom button in the lower right corner of any web page.