Dynamic Objects
The Dynamic Object component allows you to track the position and state of GameObjects during the Participant's session. These can be used to track controllers, non player characters (NPC), and interactive objects.
This page covers using the Dynamic Object component, Uploading Meshes, and advanced topics including Recording Engagements, and Spawning Dynamic Objects.
Currently unsupported
- Material or texture changes
- Particle Systems (see Proxy Meshes)
- Skeletal Animations
- Mesh Deformation
Getting Started
For most implementations of Dynamic Objects, simply attaching a Dynamic Object component to your Unity GameObject and uploading your scene is all you need to do.
Usually you will add this component to all relevant objects in your scene during the Scene Setup process. You can often configure or change dynamic objects afterwards without having to re-upload the scene. This can be done with the Manage Dynamic Objects window in the Cognitive3D menu.
Tracking gaze and fixations on a Dynamic Object uses physics raycasts. Make sure you have colliders attached, and these colliders closely represent the surface of the object to record accurate gaze data. A Mesh Collider component is often the most accurate and easy to set up, but may have performance implications.
If you wish to customize your implementation, feel free to read on, but you are likely done.
Basic Settings
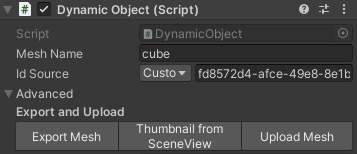
- Mesh Name - Choose a mesh name to represent this GameObject on SceneExplorer. A default mesh name is automatically chosen when you add a Dynamic Object component.
- Id Source - Identifies this specific Dynamic Object instance. This is used for aggregating data across multiple sessions. Other options exist for when spawning objects during runtime. See Spawning Dynamic Objects for details.
Export and Upload (Advanced)
- Export Mesh - Exports the MeshRenderers from the selected GameObject to a temporary directory, and generates a basic thumbnail.
- Thumbnail from SceneView - Takes a screenshot from the Unity Scene viewport to represent this mesh on the Dashboard.
- Upload Mesh - Uploads the mesh and thumbnail from this temporary directory to the current level (if the level has been uploaded to SceneExplorer).
Data Snapshot (Advanced)
- Is Controller - Appends additional properties to this dynamic object to display controller inputs on SceneExplorer. See Troubleshooting for a detailed manual setup.
- Is Right Hand - Indicates that a controller represents the right hand
- Sync with Gaze - Causes this Dynamic Object to record data on the same interval as Gaze. For example, if the participant is in a vehicle, this can make movement appear smoother on SceneExplorer.
- Update Rate - How frequently this dynamic object will check if it has moved/rotated/scaled beyond a threshold and should record its new transformation.
- Position Threshold - Meters the object must move to record new data.
- Rotation Threshold - Degrees the object must rotate to record new data.
- Scale Threshold - Percent the object must scale to record new data.
Setup and Uploading
Dynamic Object Meshes
A mesh representing a Dynamic Object is uploaded to SceneExplorer and saved to your scene on our cloud. If you have multiple scenes, you will have to upload mesh data to each scene or version. This will happen automatically during the Scene Setup. You can add new Dynamic Objects, upload new meshes and replace existing meshes without uploading a New Scene Version.
Uploading Dynamic Meshes - Component
Using the Dynamic Object component, you can set manually set a Mesh Name. Taking a Screenshot from the Unity Viewport will allow you to quickly identify the Dynamic Object on the Dashboard. This screenshot is shared between all Dynamic Objects with the same Mesh Name.
Uploading Dynamic Meshes Window
From the Cognitive3D menu, the Manage Dynamic Objects window display an overview of all the dynamic objects in the open scene. The Dynamic Mesh Upload section has options to quickly export and upload multiple Dynamic Object meshes.
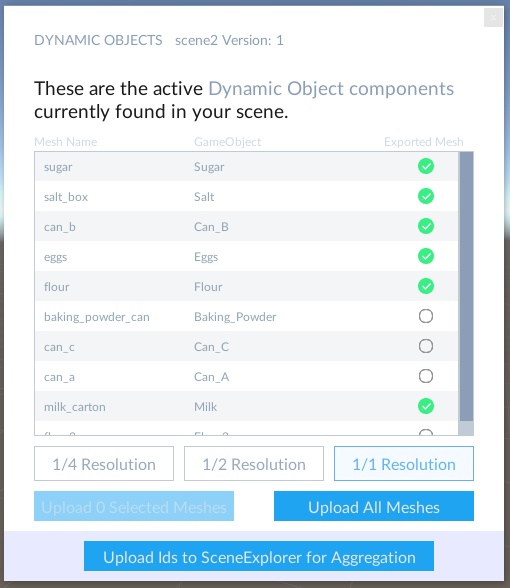
You can either Upload X Selected Meshes, or Upload All Meshes. This will upload each Dynamic Mesh to your currently open Unity scene. This also happens automatically when you upload a New Scene or New Scene Version from the Cognitive Scene Setup Window.
Advanced Use Cases
Aggregating Data between Sessions
When a Dynamic Object has identical Dynamic Object Ids in multiple Sessions, data will be aggregated and displayed on the Dashboard. These will appear in the Dynamic Objects sidebar.
Proxy Meshes
Some visual elements in Unity cannot be easily exported and reconstructed in SceneExplorer. One example is particle systems. You might also have a very detailed model that doesn't need to be rendered in high fidelity on SceneExplorer. Both of these could benefit from exporting a Proxy Mesh.
First set up the Dynamic Object you want to represent. Here, we want to record a 'Fire' made from a particle system.
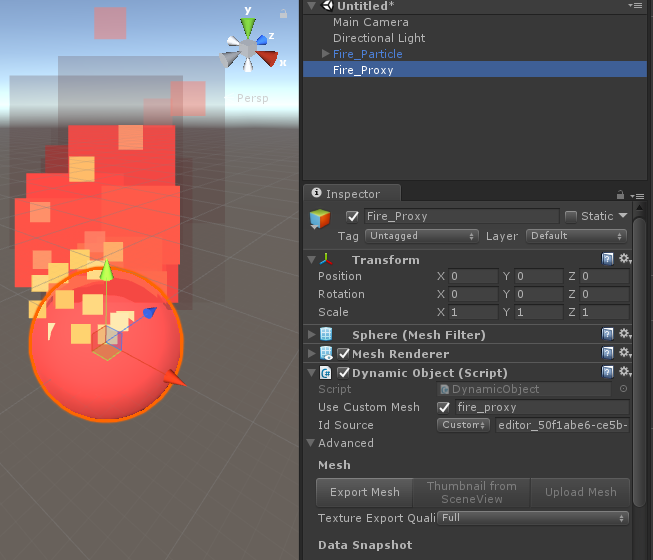
Second, create a Dynamic Object to be the proxy. Then open the proxy Dynamic Object's Advanced Options and press Export. In this example, the proxy is a red sphere named 'Fire_Proxy'. You can delete the proxy mesh from your scene afterward.
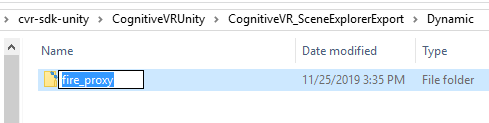
In the Cognitive3D_SceneExplorerExport/Dynamic/ folder, rename the folder to match the desired Dynamic Object's Mesh Name. In this example, the folder would be renamed from 'fire_proxy' to 'fire'. In Unity, open the desired Dynamic Object's Advanced Options, press Upload, and you are done!
Spawning Dynamic Objects
Each Scene on the Dashboard holds a collection of Dynamic Object meshes that can appear. If you are planning on spawning Dynamic Objects at runtime, make sure to temporarily add your prefabs to the scene and press the Upload Mesh button on the component. Then you can remove the prefab from your scene.
Dynamic Object components use a generated ID to uniquely identify themselves in SceneExplorer. Spawning Dynamic Objects at runtime is supported, but you may need to change the ID Source on your prefabs.
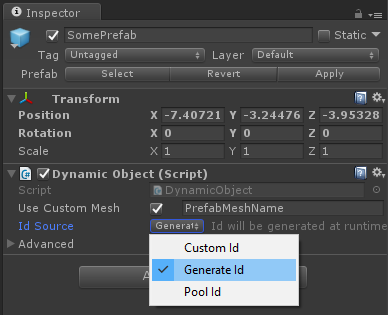
- If only one instance of a prefab is generated in a session, you can leave the ID Source as Custom Id. For example - a specialized power tool spawned to assist in a training application.
- If you don't need to aggregate data from Dynamic Objects over multiple sessions, you can set the ID Source to Generate Id. For example - a game with thrown snowballs could use this to visualize these projectiles on SceneExplorer.
- If multiple prefabs could be spawned and data needs to be aggregated over multiple sessions, you can select the ID Source to Pool Id. For example - multiple traffic cones being placed in a training application that the participant must gaze at to complete an objective.
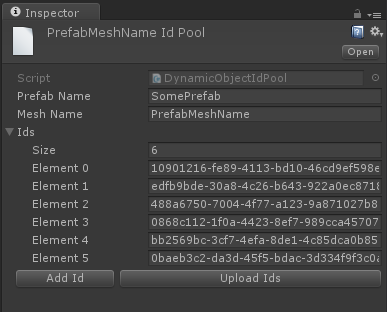
You can create a new DynamicObjectIdPool asset that will hold several Ids that will be used when new instances of this prefab are instantiated. Press the Upload Ids button on the Dynamic Object Id Pool asset to add all of the Ids to the scene's manifest.
In rare cases, it may be best to avoid spawning prefabs and simply enable existing Dynamic Objects in the scene. These can use the Custom Id option from the Dynamic Object Component.
Engagement Events
Engagement Events offer an alternate method to record interactions with your Dynamic Objects. Internally, they are implemented as Custom Events, but automatically keep a reference to active Custom Events and can be easier to manage.
An Engagement Event could represent a state such as grabbing an object, proximity to an object, pointing at an object, etc.
To begin or end an Engagement Event, call the BeginEngagement or EndEngagement function on the Dynamic Object component. The example below shows how you could implement an Engagement Event into a grab event - this will differ depending on how you implement your interactions.
void OnPickup(GameObject controllerGameObject)
{
  //your code to 'grab' the object
  //...

  var thisDynamic = GetComponent<Cognitive3D.DynamicObject>();
  if (thisDynamic != null)
  {
    thisDynamic.BeginEngagement("Grab");
  }
}

void OnDrop(GameObject controllerGameObject)
{
  //your code to 'drop' the object
  //...
  var thisDynamic = GetComponent<Cognitive3D.DynamicObject>();
  if (thisDynamic != null)
  {
    thisDynamic.EndEngagement("Grab");
  }
}
Sync with Gaze
This option will record the Dynamic Object position at the exact same time as the HMD position is recorded. For performance, Dynamic Objects may be updated slightly later than HMD position. On SceneExplorer this is noticeable when Dynamic Objects are moving relative to the HMD.
For example - the participant may wear a hardhat as they drive a forklift in a training application. The clothing and vehicle should use this Sync with Gaze option to nicely visualize the movements.
Controllers
It is recommended that you use the Scene Setup process to automatically set up the required components for recording controller inputs. The mesh used to display the controller in SceneExplorer is assigned automatically based on the device name. Dynamic Objects for controllers can display the participant's inputs in a popup window in SceneExplorer:

![]() If you have a question or any feedback about our documentation please use the Intercom button in the lower right corner of any web page.
If you have a question or any feedback about our documentation please use the Intercom button in the lower right corner of any web page.